mps430 是 TI 所出的MCU,性能優異而且長年霸佔省電應用的市場。
近幾年來價格也大幅度下殺。
 |
| 直接從TI網站擷取的價格(2016年),大抵上低於一美元 |
本次實驗的硬體則是LaunchPad,除了主晶片是msp430g2553之外還附帶燒錄器
 |
| 網拍購得,大約四五百元。 |
Compiler 則是使用 mspgcc
IDE 使用 CodeBlocks
燒錄器可以使用 MSP430Flasher
(下載來的壓縮包名稱應該會是slac435f.zip包括板子的驅動程式)
或是 mspdebug (僅有原始碼,須根據不同機器自己compiler,這東西日後另外開文章再談)
接下來吧 mspgcc 解壓縮放到 C:\HighTec\Msp430
把 MSP430Flasher 放到 C:\HighTec\MSP430Flasher
啟動 Code Blocks 建立空白新專案
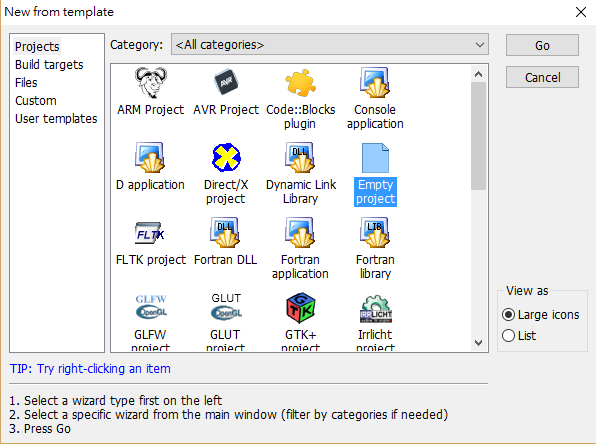


 |
| Compiler 記得選擇 MSP430專用的,然後compiler後的obj檔就放進目錄obj,最後的輸出放在目錄bin |
Compiler 設定要改一點東西,從Code Blocks 的 Settings >> Compiler... 進入
 |
| 在 Selected compiler 選擇 GNU GCC Compiler for MSP430 , 接著看下面的 Toolchain executables 設定是否有確實鏈結 |
專案設定這樣做點改變,從Code Blocks 的 Project >> Properties 進入設定。
點選標籤 Build targets ,使得 compiler 編完之後是elf檔。
點選標籤 Build targets ,使得 compiler 編完之後是elf檔。

從Code Blocks 的 Project >> Build options 進入設定。
點選標籤 Search directories 接著點下面的子標籤 Linker,
按下Add新增目錄把 Loader Script 的指定放進來。

同樣在Code Blocks 的 Project >> Build options 進入設定。
點選標籤 Pre/post build steps ,在Post-build steps 添加點指令,
讓編譯與鏈結完成後,將elf檔編為hex檔準備燒錄。

在這裡添加的指令是
C:\HighTec\Msp430\bin\msp430-objcopy -O ihex ${TARGET_OUTPUT_DIR}${PROJECT_NAME}.elf ${TARGET_OUTPUT_DIR}${PROJECT_NAME}.hex
cmd /c "C:\HighTec\Msp430\bin\msp430-objdump -S ${TARGET_OUTPUT_DIR}${PROJECT_NAME}.elf > ${TARGET_OUTPUT_DIR}${PROJECT_NAME}.asm"
C:\HighTec\Msp430\bin\msp430-size ${TARGET_OUTPUT_DIR}${PROJECT_NAME}.elf
分別是將elf編為hex檔做燒錄使用、將elf檔編為組合語言asm檔以利除錯,
以及顯示elf檔內部的實際資料量。
其中 ${} 代表的是Code Blocks的巨集指令,這樣使用後就會自動找到專案對應的目錄和檔案名稱。
最後的設定是燒錄器,從Code Blcoks 的 Tools >> Configure tools.. 進入設定
進入後使用Add添加燒錄器用的操作。

Excutable 項目內設定的是燒錄軟體的所在,Parameters 則是對應的參數。
這裡所使用的參數為
-n msp4302553 -w ${TARGET_OUTPUT_DIR}${PROJECT_NAME}.hex -v -g -z [VCC]
一樣有巨集描述,讓Code Blocks自動指定好目標檔案。
在新專案之後,並且完成前面的設定,新增一個叫做 main.c 的檔案並且加入專案中

寫個閃爍 LED 的程式

寫個閃爍 LED 的程式
 |
| 文字編輯視窗是黑底的,因為我做了點不同的設定讓眼睛舒適,詳見 Code Blocks Theme |
在此LED的閃爍程式是:
#define TIMERA0_VECTOR TIMER0_A0_VECTOR
#define TIMERA1_VECTOR TIMER0_A1_VECTOR
#endif
#include "msp430g2553.h"
#define P1output ((struct SFRbitDef *) 0x21)
#define P1input ((struct SFRbitDef *) 0x20)
#define LED1 (P1input->B0)
#define LED2 (P1input->B6)
struct SFRbitDef {
unsigned B0 :1;
unsigned B1 :1;
unsigned B2 :1;
unsigned B3 :1;
unsigned B4 :1;
unsigned B5 :1;
unsigned B6 :1;
unsigned B7 :1;
};
unsigned int time10ms;
// Timer A0 interrupt service routine
#pragma vector=TIMER0_A0_VECTOR
__interrupt void Timer_A0_ISR(void)
{
time10ms++;
}
int main()
{
WDTCTL = WDTPW | WDTHOLD ;
BCSCTL1=CALBC1_1MHZ;
DCOCTL =CALDCO_1MHZ;
time10ms=0;
P1DIR = BIT0 | BIT6 ; // P1.0 = LED1, P1.6 = LED2
P1output->B0=1;P1output->B6=0;
/*
* SMCLK = 1MHz, 10mS = 10^(-2) Sec
* CCR0 = (10^(-2)) * (1* (10 ^ 6)) / 4 = 2500
*/
TACTL = TASSEL_2 + MC_1 + ID_2; // SMCLK/4, upmode
CCR0 = 2500;
CCTL0 = CCIE; // CCR0 interrupt enabled
_EINT(); // Enable interrupt
while(1)
{
if(time10ms>50)
{
P1output->B0=~(P1output->B0);
P1output->B6=~(P1output->B6); // 看不懂為什麼這樣能夠操作的,詳見這邊
time10ms = time10ms-50;
}
}
return 0;
}
完成後存檔。
按下 Build  功能鍵,將整個專案編譯好
Build log 視窗則會出現

最後就是燒錄的動作了,
點選 Code Blocks 的 Tools >> MSP430Flasher 就會出現DOS的文字視窗運作燒錄軟體。
功能鍵,將整個專案編譯好Build log 視窗則會出現

把訊息拿出來看則是
-------------- Clean: Debug in LED (compiler: GNU GCC Compiler for MSP430)---------------
Cleaned "LED - Debug"
-------------- Build: Debug in LED (compiler: GNU GCC Compiler for MSP430)---------------
msp430-gcc.exe -IC:\HighTec\Msp430\msp430\include -c main.c -o obj\main.o
msp430-gcc.exe -LC:\HighTec\Msp430\msp430\lib\ldscripts\msp430g2553 -o bin\LED.elf obj\main.o
Output file is bin\LED.elf with size 6.24 KB
Running project post-build steps
C:\HighTec\Msp430\bin\msp430-objcopy -O ihex bin\LED.elf bin\LED.hex
cmd /c "C:\HighTec\Msp430\bin\msp430-objdump -S bin\LED.elf > bin\LED.asm"
C:\HighTec\Msp430\bin\msp430-size bin\LED.elf
text data bss dec hex filename
326 0 4 330 14a bin\LED.elf
Process terminated with status 0 (0 minute(s), 4 second(s))
0 error(s), 0 warning(s) (0 minute(s), 4 second(s))
一切都很順暢地完成了編譯,組合語言碼也順利產生,整個程式的容量是330行指令。
點個LED也能寫出這麼多程式,其實是沒有使用最佳化功能的關係。
組合語言的asm檔,則可以用另外的編輯器打開來看,幫助除錯。
 |
| LED.asm 檔案內容,使用Notepad++ 檢視 |
點選 Code Blocks 的 Tools >> MSP430Flasher 就會出現DOS的文字視窗運作燒錄軟體。
 |
| 在win10下不明原因有時會失敗,多執行幾次燒錄就會成功。在XP和Win7則沒有這種現象。 |
於是燒錄完成。可以看到LED隨著每秒變化閃動。


你好 我在使用MSP430Flasher.exe 遇到一些問題 ,希望能私下與你請教,不知是否方便
回覆刪除